The Baader 2" Cool-Ceramic Safety Herschel Prism Mark II
When it comes to astronomical accessories, first impressions can be just as important as the technical specifications. The Baader 2" Cool-Ceramic Safety Herschel Prism Mark II is no exception. In this blog I'm going to list some of the key features that I've read in promotional material, from observations I have made and from my own experience using this product.
My name is Ian Aiken and I live in the North East of England in the United Kingdom, which experiences a temperate maritime climate characterized by mild summers and cool winters. Cloudiness can vary throughout the year and it feels like I only get 20 usable clear nights per year at my Bortle 7 location during the 6 months where astronomical darkness actually occurs. I've been an Astrophotographer for over 20 years and I've had all kinds of telescopes, solar telescopes, mounts, filters (including Optolong, Astro Hutech, Chroma, Baader) and cameras (Atik, QHYCCD, ZWO, Canon) in this time, for both planetary, lunar, solar, and deep sky photography. Financially, I've learnt the hard way through fine tuning my current collection to something which supports my sky conditions, budget, time, and imaging goals.
What is it?
The Baader 2" Cool-Ceramic Safety Herschel Prism Mark II 2" is an optical wedge prism that refracts most of the light out of the optical path for solar observations. This is a different approach to white light filtering using products like Baader AstroSolar Safety Film, whereby a filter blocks the light at the front of the telescope. This method was first proposed and used in 1830s by an astronomer John Herschel, hence the name.
Unboxing and First Impressions
-
Packaging - Right from the get-go, Baader captures your attention with its thoughtfully designed box. Not only is it user-friendly with its easy opening, but it also offers comprehensive information about what's inside, ensuring users know exactly what they are receiving.
-
Pelican Case - Nestled within the packaging is the Peli Case - a testament to Baader's commitment to quality. Firm locking mechanisms coupled with auto venting show that this case isn't just about aesthetics; it's designed to protect the precious cargo inside. I did find the locking mechanism on my case quite firm and took some effort to open. I can probably ease that somehow.
-
Quality of Components - On handling the filters and Prism, I can instantly feel the premium build quality. These are not mere accessories, but tools crafted for enthusiasts who demand the best. German engineering is still a "thing", with focus on engineering and technical skill. That mindset shows here.
-
Presentation - The 'WOW' factor isn't just present; it's predominant, elevating the eagerness of the first-time use.
- Versions - I opted for the photographic version which comes with three additional ND filters than the visual. Everything else is the same. I was very happy that the new Solar Continuum 7.5nm is included, a new addition to the CMOS-Optimized family of Baader filters superseding the previous 10nm version.

Diving into the Details
It might be strange to talk about the manual first. Most times, the manual is never read or referenced. I highly recommend reading the manual (Baader recommend in the manual to read the manual). Maybe not word for word, but there are sections which will really help to get the best out of this product.
The Baader manual is not your typical product manual and deserves a special mention given how comprehensive of a guide it is. It’s rich in details about the product, but what struck me was its educative approach. It's not just about operating the Prism; it dives deep into its applications. The manual gives insights into optimal usages, sun observations, and even touches upon aspects like lucky imaging and how different factors can influence image quality. What and why to use different filters for different scenarios are underscored, showcasing Baader's commitment to ensuring users get the most out of their purchase. The manual subtly introduces other Baader products, but it doesn’t feel pushy. Instead, there's a clear intent to educate the user, enhancing their overall experience with the product. It is very informative and well received. It is clear Baader want you to play and experiment with different configurations, many examples on how to do this, and their adaptor systems really help you to achieve this.
Top Ten Features
-
Superior Optical Quality and Solar Safety: The Baader 2" Cool-Ceramic Safety Herschel Prism Mark II combines safety with superior optical quality, offering exceptionally clear and sharp solar images without the risk of eye damage or equipment overheating. Its prism-based system exceeds the performance of traditional solar safety films and no introduction of color fringing reducing image sharpness.
-
Enhanced Heat Management: Featuring "Cool-Ceramic" technology, the Baader 2" Cool-Ceramic Safety Herschel Prism Mark II ensures efficient heat dissipation, which maintains image stability and reduces the risk of damage to the equipment, promoting safer solar observation sessions.
-
High-Contrast and Detailed Solar Imaging: With Phantom Group anti-reflective coating and precision polishing, the Wedge reduces light scattering and blocks harmful UV and IR light, allowing for high-contrast views and detailed observation of solar phenomena like sunspots, granulation, and flares.
-
Longevity and Durable Build Quality: Crafted with high-quality materials, the Baader 2" Cool-Ceramic Safety Herschel Prism Mark II is designed for durability, ensuring longevity and performance that outlasts solar safety films and withstands wear and tear.
-
Versatile Solar Observation: The Baader 2" Cool-Ceramic Safety Herschel Prism Mark II provides multiple filtering options with included Neutral Density and Solar Continuum filters, enabling various solar features to be observed in different lights. It can be used with a wide range of telescopes and cameras, making it a versatile tool for solar imaging. It can be attached directly to the telescope's focuser or connected to most cameras using a suitable adapter. This flexibility allows both visual observers and astrophotographers to capture stunning solar images using their preferred equipment.
-
Improved Design and User Experience: The Mark II version boasts an improved build quality and refined design, ensuring a better performance and an engaging unboxing experience that enhances user interaction from the start.
-
Education and Enhanced User Insight: The detailed manual and added insights offer an educational aspect, improving user understanding of solar observation and providing a more informative experience compared to simpler guides.
-
Advanced Image Results Potential: Leveraging advancements in technology, the Baader 2" Cool-Ceramic Safety Herschel Prism Mark II aims to deliver better contrast, more detailed images, and a more authentic white-light view of the sun than previous models and traditional solar films. The Solar Continuum Filter is designed to enhance the contrast of solar images, it brings out the finest solar details, making sunspots, granulation, and faculae more visible.
-
User-Friendly Setup and Operation: The wedge is engineered for ease of use with minimal setup time required, ensuring that observers can focus more on the observation and less on equipment configuration.
- Comprehensive Solar Observing Solution: Combining safety, educational value, high-quality construction, and user-friendly design, the Baader 2" Cool-Ceramic Safety Herschel Prism Mark II stands as a comprehensive solution for both amateur and experienced solar observers, promising many years of enjoyment in solar astronomy.

Cool Under the Sun - Heat Management and Optimum Image Contrast
The "Cool-Ceramic" technology it boasts isn’t just a fancy term, although it is cool… pun intended; it's a crucial innovation that sets this product apart from competitors in my opinion. Drawing inspiration from the heat tiles used on space shuttles, which protect astronauts from the intense heat of re-entry, the Cool-Ceramic element in the Herschel Prism serves a similar protective purpose. It absorbs and dissipates solar heat, preventing the equipment from overheating without impacting the surrounding environment and view. This feature is crucial for maintaining a cooler operating temperature, which in turn helps in providing clearer and more detailed views of the sun by preventing thermals and astigmatism caused by the unwanted heat.
Moreover, the precision polishing and multi-coating of the Prism's optics are more than just about achieving high-contrast and detailed solar images. The coatings are designed to reduce the scattering of light, improving the overall image quality while simultaneously blocking harmful UV and IR radiation. This isn’t just beneficial for your equipment; it’s a safety feature that protects your vision during solar observation.
Included Filters
The Herschel prism ensures safe full-aperture solar views without image degradation, offering superior resolution and contrast compared to many other white-light filters. Its efficient internal baffling and prism rear-face multicoating further reduce scatter and maximize contrast. For safety and optimal performance, the prism includes a permanently pre-installed precision polished and coated Baader ND 3.0 filter within the housing. This filter is critical for any visual observation, as it ensures that the observer is never exposed to unfiltered light which may cause irreversible damage to the eye. Baader, putting safety first, recommend to always "reset" the Herschel Prism after every use, ensuring to put the ND 3.0 filter back so that it is always ready for visual, as you may forget to reset it next time you use it.
The scope of supply also includes the latest Solar Continuum filter 7.5nm (540nm CWL), also preinstalled, for maximising contrast, and on the photographic version ND 1.8, 0.9 and 0.6. As an option, a polarising filter can also be installed and using the integrated rotation mechanism brightness can be adjusted easily.
Matching with the right telescope
In terms of compatibility, the Herschel prism can be used with various telescopes, but it is important to consider both the aperture and the f/ratio of the telescope. A telescope with a longer focal length will produce a wider beam of light, which distributes the energy over a larger area, reducing the risk of overheating. However, this also means that there is a higher risk of the light not completely hitting the prism when observing details at the edge of the sun. Baader state that the Prism is compatible up to 4.5m focal length (approx. every 1m focal length equates to a solar image of 1cm, on a telescope up to 6 inch. They also state the Prism can be used on telescopes between 6 and 8 inches, but recommend you swing it away from the sun periodically to prevent heat buildup, and finally a focal ratio of f/6 or lower.
You can download the manual for more info here.
Imaging AR3590
It's worth noting that when observing or photographing the Sun, it is crucial to follow appropriate safety guidelines to protect your eyes and equipment. Always consult the manufacturer's instructions and consider seeking advice from experienced solar observers or astronomers before undertaking solar observations.
So… what do I do? Read the manual first. Yes, done that, sort of, most of it. The benefits of living somewhere with lush greenery from the persistent clouds and rain, means plenty time to read and plan. Which filters do I need? Let's start with what it's installed with. The Solar Continuum and the ND 3.0. I'll check the brightness visually and then with camera. I may not need to change and can adapt and fine tune later with more use.
I first attempted to use the prism with a 102mm Skywatcher achromat refractor, however, it was very hazy (if not just cloudy) and I gave up. This is typical conditions for me in Winter in the Northern Hemisphere. I'm located 55.54N, and the Sun is reaching a max alt of around 26 degrees by transit, and I am only at 38 metres altitude above sea level. Not ideal.
Disclaimer: Eagle-eyed readers will notice the product photography is with the Skywatcher 102mm telescope and a QHY5III200M camera from the first attempt, but the images I later produced of the Sun are with the Bresser and QHY5III462M (the giveaway is the 200M uses a USB-C cable, and 462M uses the larger USB-B 3).
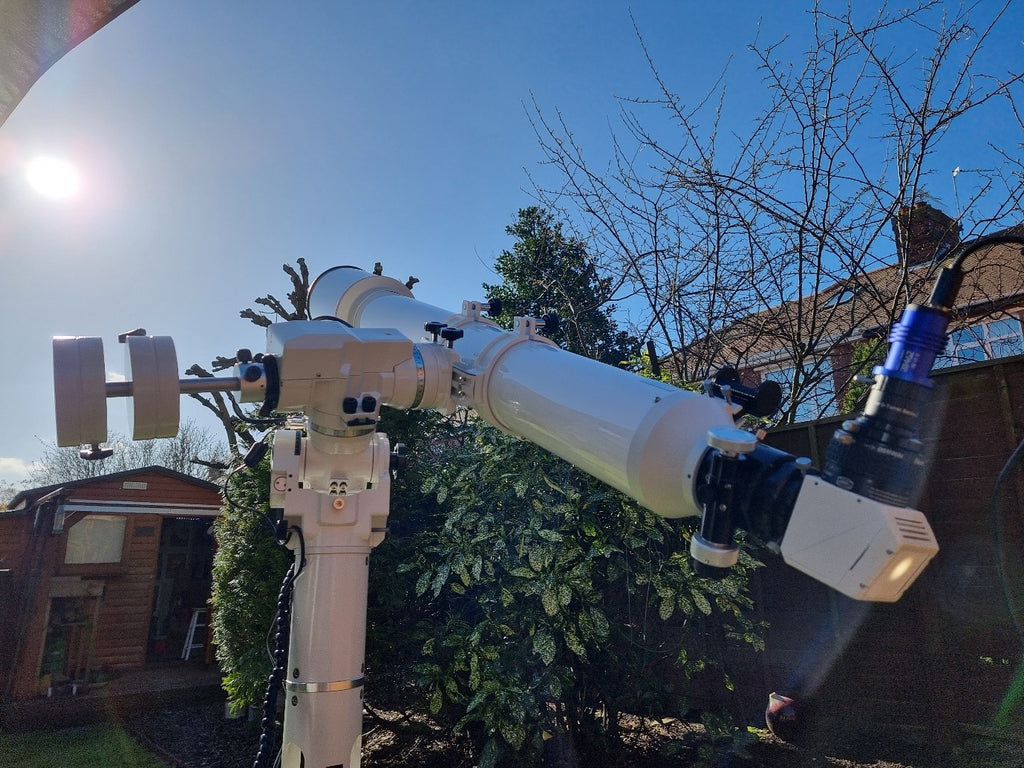
On my second attempt, I opted to use BRESSER Messier AR-127L/1200 Achromatic f/9.4 telescope (which has a lovely smooth and stable Hexafoc focuser) mounted on a AZ EQ5 GT in my garden. Unfortunately, I was not able to mount this telescope in my roll off roof observatory because I already have a RASA 11 side by side with a C9.25 and its close if not already at the imaging limits on the EQ8.
The camera I opted to use is the IR sensitive QHY5III462M Mono Camera. Let's not dwell on the fact I am blocking all the IR I can with the Solar Continuum filter so that sensitivity is wasted, it was primarily purchased for lunar imaging (which is more stable in IR).
You may think my Celestron C9.25 telescope would produce better results with the Herschel. It doesn't, unfiltered sunlight hitting the primary and being focussed down to the secondary would most certainly destroy the telescope and is not recommended, in this use case I'd need to use Baader AstroSolar film and block all that energy before it entered the telescope.
Let's just see what happens before the cloud roll in.
Setup
The setup process is remarkably straightforward. Sticking with the default configuration, I left the Baader Herschel Prism equipped with the pre-installed Solar Continuum filter and the ND3 filter. This combination proved to be spot-on for observing the Sun's spectrum without any exposure issues. The filters not only provided a safeguard against the intense solar brightness but also enhanced the surface detail, allowing for a crisp and clear image.
The setup process was also a great opportunity to appreciate the solid build, which really stood out, and the attention to detail that Baader has put into this product.
Connecting Camera
Connecting the camera was as seamless as the rest of the process. The Baader Herschel Prism accommodates a variety of camera attachments, which is a testament to its versatility. I used the provided T-ring adapter to connect my camera, ensuring a secure and stable connection that gave me confidence during the imaging session.
Pointing to the Sun
Once the setup was complete, pointing the telescope at the Sun was the next step. Aligning the telescope to the Sun initially seemed daunting, but the Baader Herschel Prism's design made it simpler than anticipated. I am very used to trying to use finders, not necessarily aligned with the telescope fully, to pinpoint a small disc onto an even smaller sensor. A lot of back-and-forth slewing was anticipated, but with the aid of the built in solar finder on the back of the Prism, pinpointing the Sun was done with ease and precision and within seconds. Literally seconds. Think of it as a built-in flip-mirror, but easier.
The rear plate of the Herschel Prism, often referred to as the 'solar finder', was instrumental in achieving this quick alignment. Its purpose is to help you align your telescope with the Sun safely. The sun's image is projected onto the rear plate, allowing for precise alignment without the risk of looking directly at the Sun. It's a small but critical detail that enhances the overall user experience and makes aligning to the Sun easier than opening the very strong and sturdy Peli case that it comes in.
Imaging
Finding focus was easy. The Baader Herschel Prism has same back focus as a typical diagonal, so all I need to do was pop an eye piece or camera in as I'd normally do. I achieved focus manually with ease even without the upgraded Bresser 1:8 gear-set (I didn't have a motor fitted at the time otherwise I'd have used that). The imaging capabilities of the Baader Herschel Prism are where this tool really shines (enough with the puns?), quite literally. The sun's image, once projected through the prism and onto my camera's sensor, was nothing short of stunning. The detail in the sunspots and the solar surface granularity was exceptionally clear. The high-contrast imaging this device provides is a game-changer for both amateur and serious solar photographers.
I was delighted to find that the exposure length was not a problem; I could capture images at my camera's maximum frame rate with a low enough exposure / gain combo. This speaks volumes about the efficiency of the Prism's design in managing light transmission and heat. By not having to fiddle with filter configurations or exposure settings, I was able to focus on what mattered most: observing and capturing the Sun's dynamic features.
More on imaging later.
Visual Use and Baader MaxBright BinoViewer
For those who prefer visual observation, the Baader MaxBright BinoViewer pairs perfectly with the Herschel Prism, and features pop out as if you could touch them. It's an experience that's hard to describe and needs to be seen to be believed.
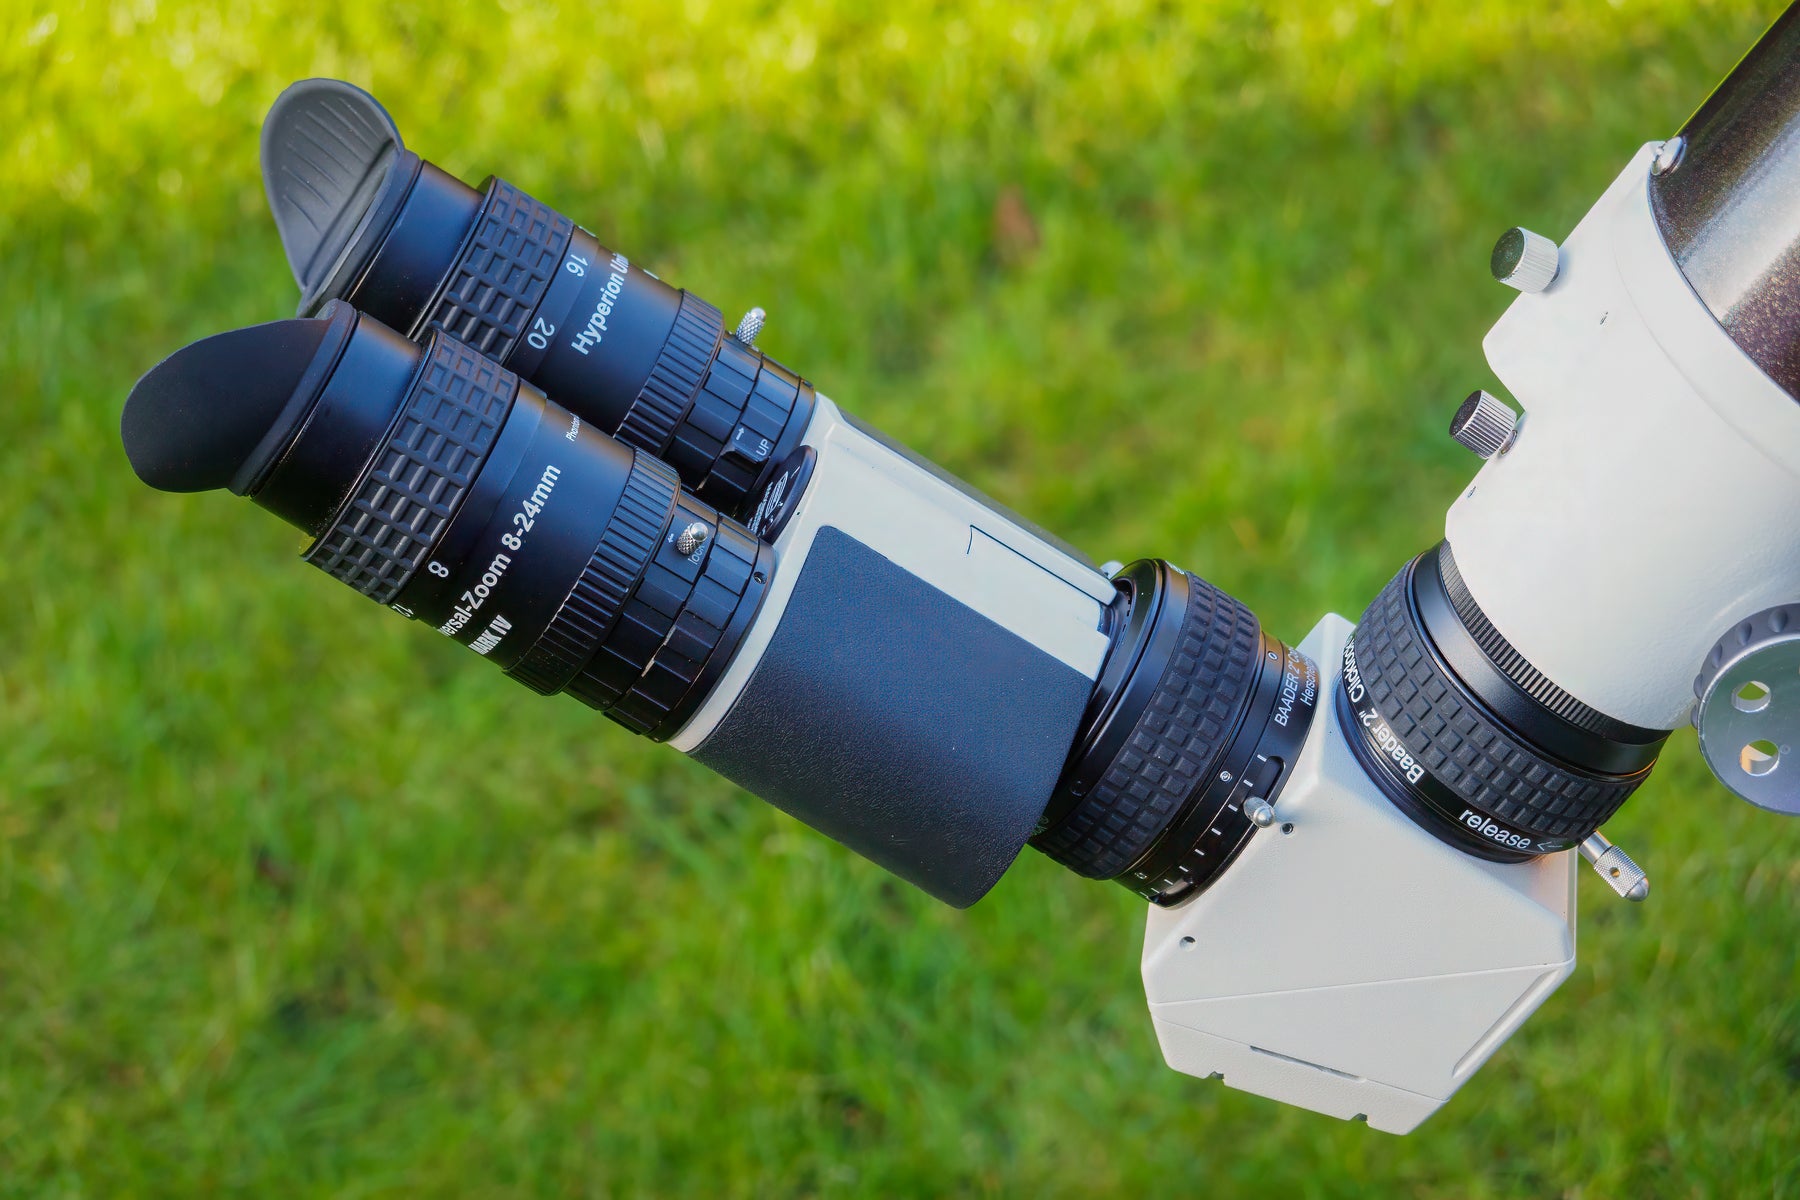
I recently managed to acquire a customer return MaxBright BinoViewers Mk2 with a bit discount from a reputable dealer here in the UK which I matched with two Baader Hyperion Zoom eyepieces. The BinoViewer makes the solar observation experience more comfortable and immersive, providing a three-dimensional effect that makes the solar surface pop! I was not prepared for the view. I did use a glass path corrector to achieve focus, and I didn't use the optional direct connection, which is fully explained in the manual.
I did try with just a single Baader Hyperion Zoom, and the view was great, but not as immersive as when using the MaxBright BinoViewer.
Opening the Herschel Prism can seem daunting, but it is straight forward enough to take apart and more importantly put back together. Baader provide a handy tool to remove the filters within. Interestingly, while the box prominently displays the polarising filter, it's the Solar Continuum filter that comes with the photography package. Now, it's not an error — the inclusion of the Solar Continuum is explicitly mentioned. However, the polarising filter's prominent display might be a nudge for an additional purchase. After a bit research, and read of the manual, I concluded the polarising filter is simply to adjust the brightness (that just didn't click, even though I have used these types of filters frequently with terrestrial photography over the last 35 or so years) and that I didn't really need to adjust the brightness, at least not yet, but noted that it is a very simple and effective solution for controlling brightness, particularly for visual use. I've learned from other users that once you install a polarizing filter and utilize the built-in rotation mechanism, you would always want to use this setup due to the simplicity of adjusting brightness. It's incredibly user-friendly. This is a testament to Baader's clever design and attention to detail.
With regards to heat management, by this point I had the scope pointing at the Sun for a number of hours and I couldn't really notice any increased heat, nothing that stood out. Nothing was hot. Ceramic plates can certainly reach to temperatures over 100 Celsius, or 212 Fahrenheit, but this handled the heat very well and was no where near this. The ceramic plate is the "solar-finder". The combination of the ceramic plate, the grills for airflow and the "heat cage", as described in the manual as only being connected to the outer shell with four screws, works very effectively dissipating heat.
Baader Herschel Prism Mk2 fitted with Baader MaxBright BinoViewer and Two Hyperion Zooms

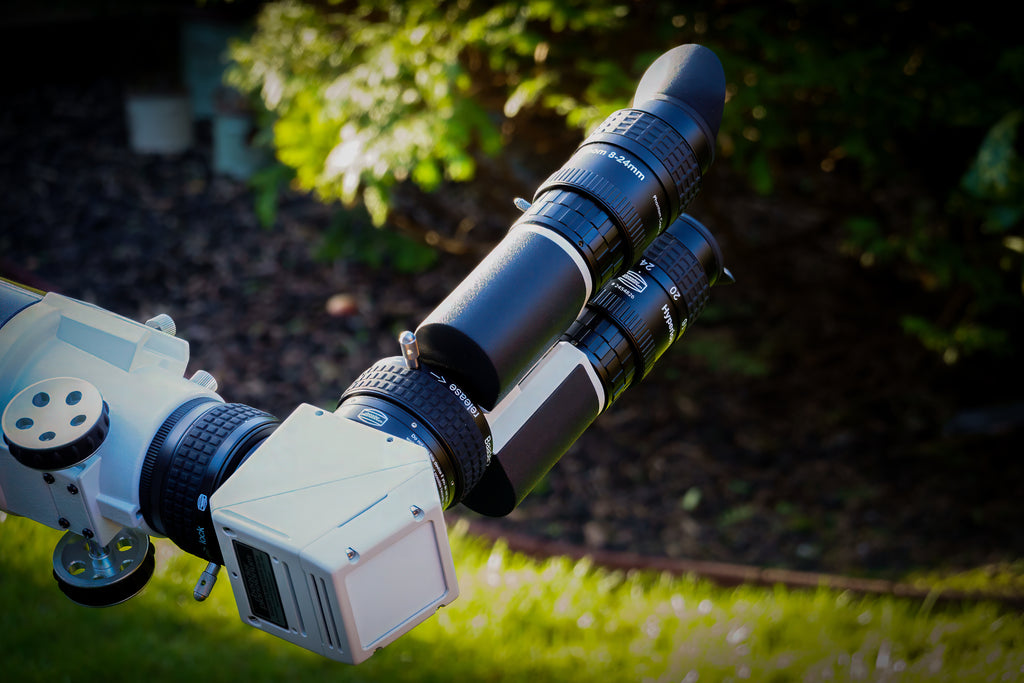
Baader Hershel Prism Mk2 fitted with Baader Hyperion Zoom Eyepiece. The solar disc is shown on the Herschel's built-in "Solar-Finder".
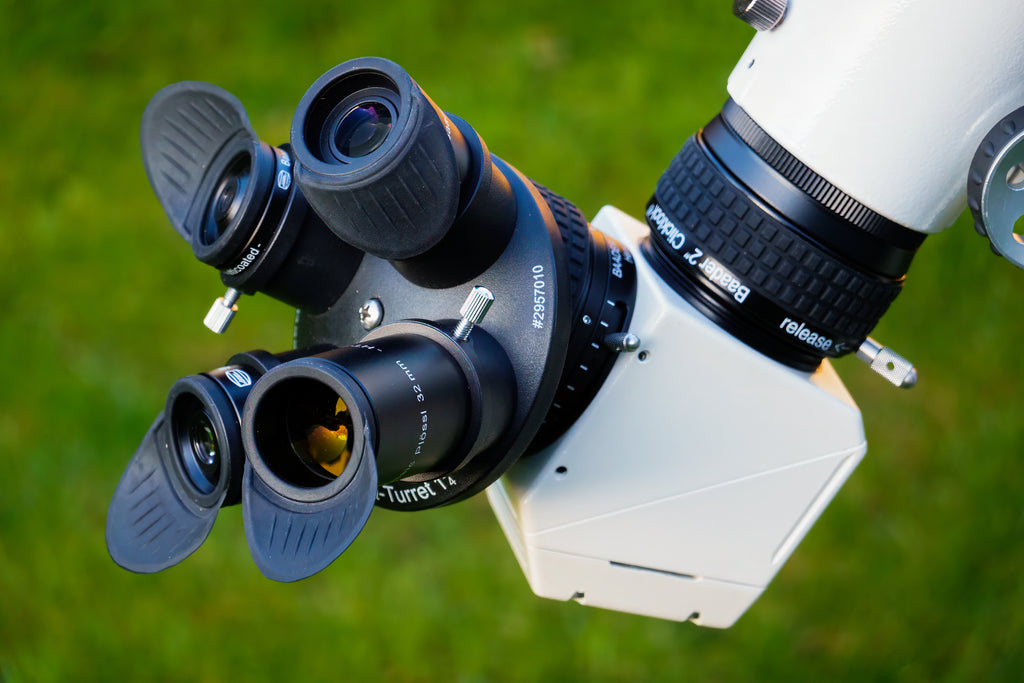
Baader Herschel Prism Mk2 fitted with Baader Q-Turret
Imaging Workflow
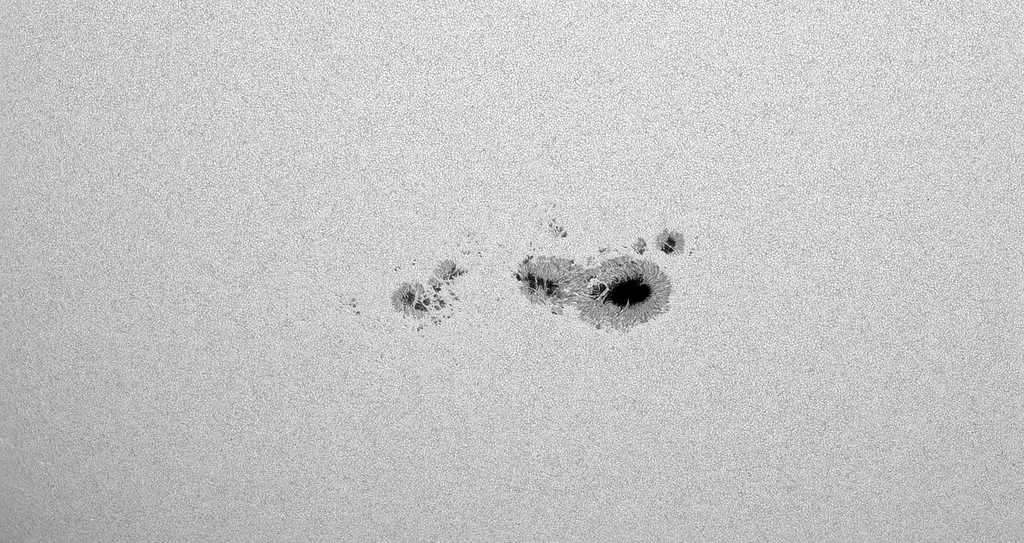
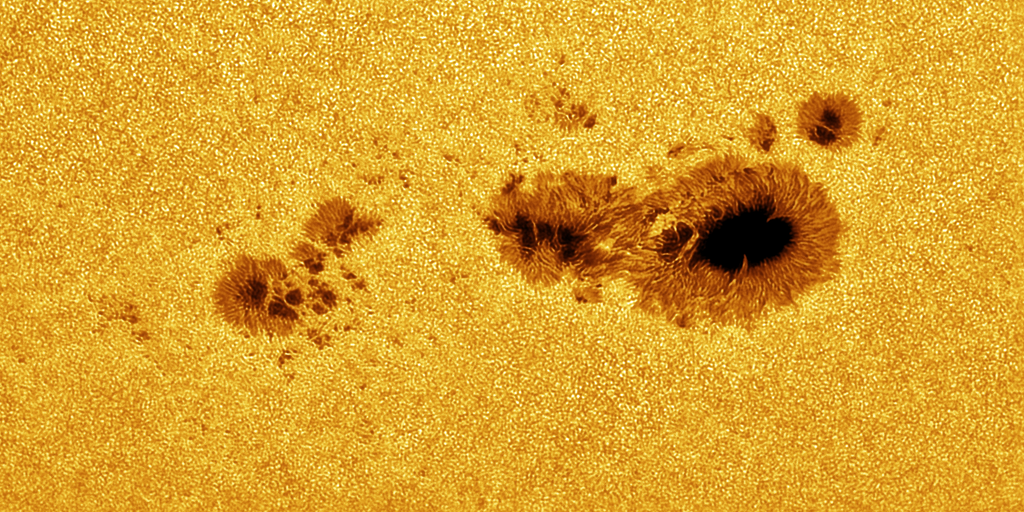
I was thankfully able to image one of the largest Sunspots visible on the sun for many years, AR3590 captured on the 24th of February 2024. For this I used the Bresser AR127/1200L with QHY5III462M camera. I shot native focal length at 1.2m, and with the Baader Q-Turret Barlow at 2.7m.
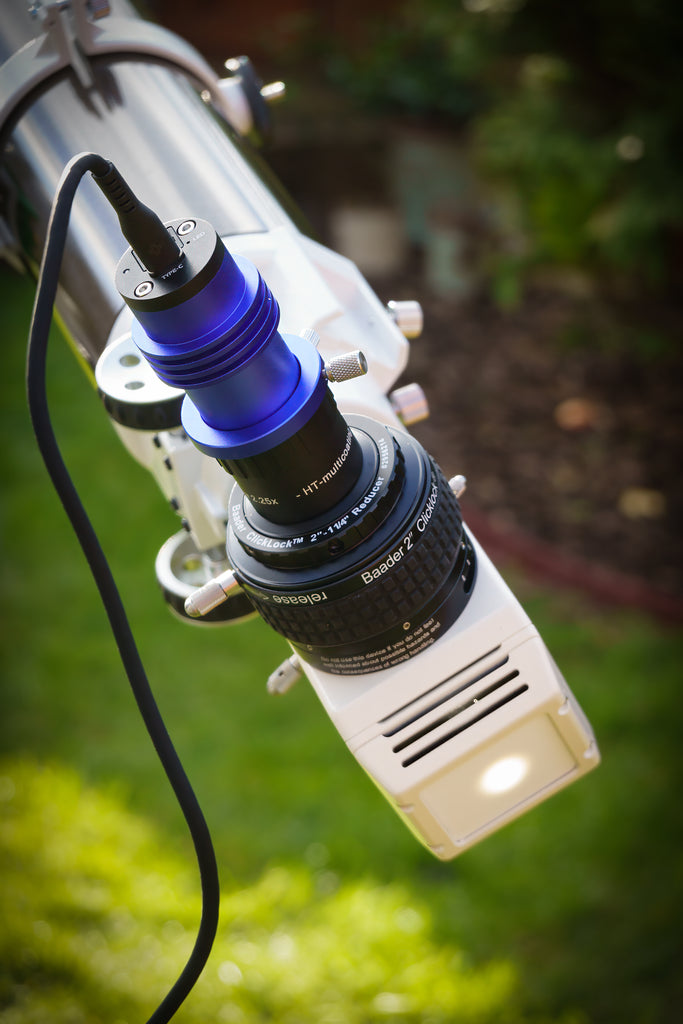
Baader Herschel Prism Mk2 fitted with QHY Imaging Camera
Processing: From Capture to Masterpiece
Capturing the Sun is just the beginning. The raw data collected through the Baader 2" Cool-Ceramic Safety Herschel Prism Mark II holds untapped potential that, with the right processing, can transform into a stunning solar portrait. Here's a look at the processing workflow I followed to bring the data to life captured during the "lucky imaging" session.
Stacking with Autostakkert 4
It all begins with Autostakkert 4, a powerful tool for stacking images. Stacking is essential in astrophotography to increase image sharpness and reduce noise. After importing the .ser video file captured through the Baader Prism, Autostakkert analyzes, aligns, and stacks the sharpest frames, effectively boosting the signal and bringing forward the subtle textures of the solar surface. I'd recommend reading and viewing videos on best usage. Until recently I didn't really understand all the settings, but after reading Solar Astronomy published by Axilone, edited by Christian Viladrich and authored by many authors, I came to understand more about AP size in relation to details and some other points, which has really resulted in better stack outputs. This book is well worth the investment.
Refining with IMPPG
Next, the stacked image is passed to IMPPG for deconvolution and sharpening. Deconvolution is a sophisticated technique to correct the blurring and improve the image's fidelity, while sharpening accentuates the fine details. IMPPG is particularly adept at enhancing solar images, where every granule and sunspot's edge can become more defined, making the image pop with clarity.
Final Touches in PixInsight with SolarToolBox
The penultimate stage is PixInsight, a powerhouse of astrophotography processing. Using the SolarToolBox, the final touches are applied. Adjustments to the black and white points set the tonal range, ensuring that the full spectrum of luminance is represented. Contrast enhancement deepens the darks and brightens the lights, giving the image a dynamic range that mirrors the Sun's intense radiance. Very thankful for this new toolbox, which I became aware of a few days after capturing the data. If you've not got this, check it out.
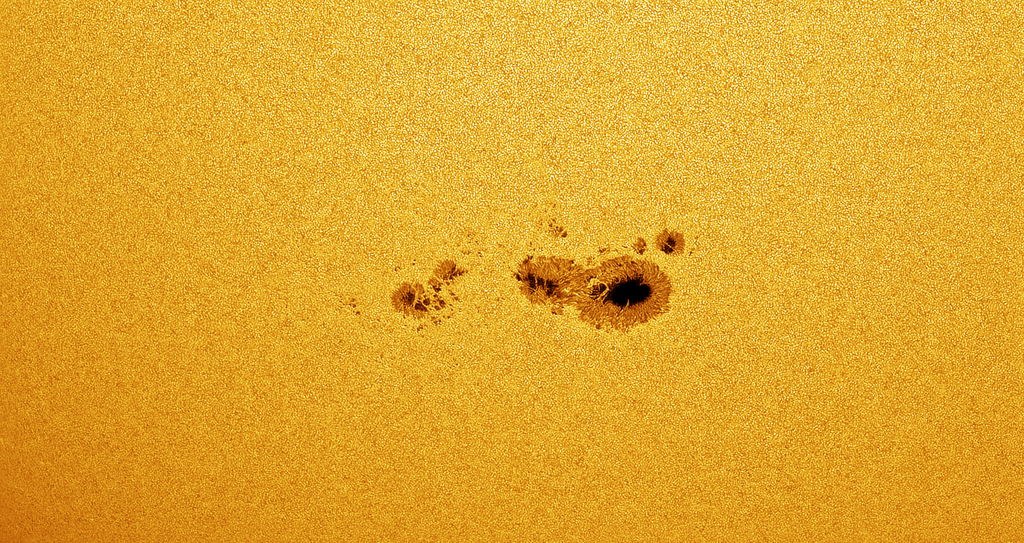
Bringing Color to the Sun
In the last step, a false color is applied. This isn't just for aesthetic appeal; different colors can represent various layers and features of the Sun, often used to highlight specific elements like magnetic fields or temperature ranges. The choice of color is both a scientific and artistic decision, reflecting the features you wish to emphasize. I went with defaults, although I did boost a bit colour contrast.
The Result
The final images stands as a testament to both the Baader Herschel Prism's capabilities and the power of post-processing in astrophotography. From a series of video frames to a sharp, detailed, and beautifully rendered image of our closest star, the processing workflow is as crucial as the capture itself. It's a blend of art and science, where technology meets creativity, resulting in images that not only educate but also inspire.
Bresser AR127/1200L with the Baader Herschel Prism Mk2 and QHY Imaging Camera
Native Focal Length - AR3590 at 1.2m with Bresser AR127/1200L and QHY5III462M
Ansel Adams stated, "you don’t take a photograph, you make it". How appropriate for solar imaging. To make a good image, you need good data. You can only do so much with poor data, be it from equipment or atmospheric seeing. The image starts with the Herschel.
As mentioned, at 55.54N, the Sun in Feb only reaches around 26 degrees alt, so it's very low, and midday when I can image the Sun at this time of year. But I did, and the results speak for themselves.
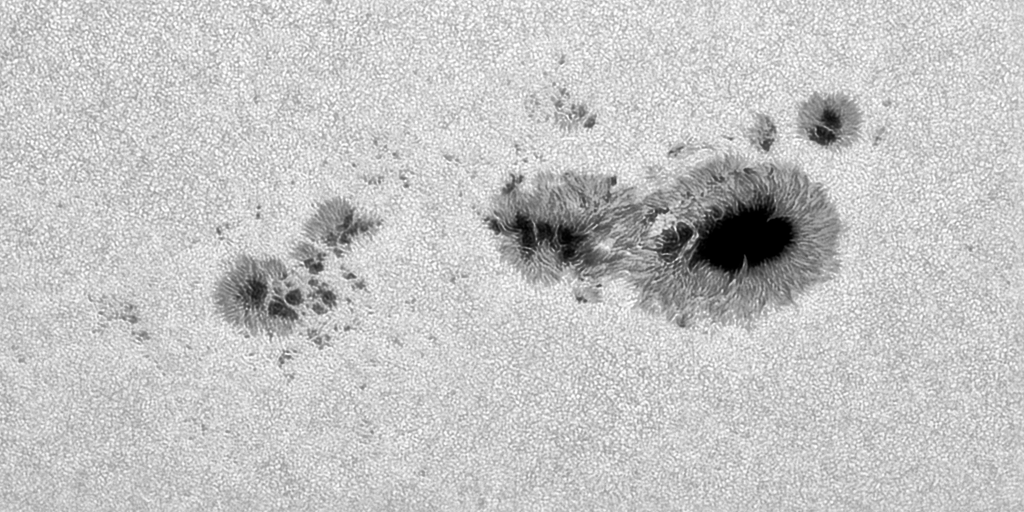
In these examples, I feel for both focal lengths show good detail in granulation, in the 2.7m you can see the polygonal shapes of the granules. The penumbra (spot halo) is irregular but not overly complex in the main spot, more complex in other parts, with good definition on the outer of the umbra (spot), and a few solar pores surrounding the sunspots.
With the Baader 2.25x Barlow at 2.7m with Bresser AR127/1200L and QHY5III462M
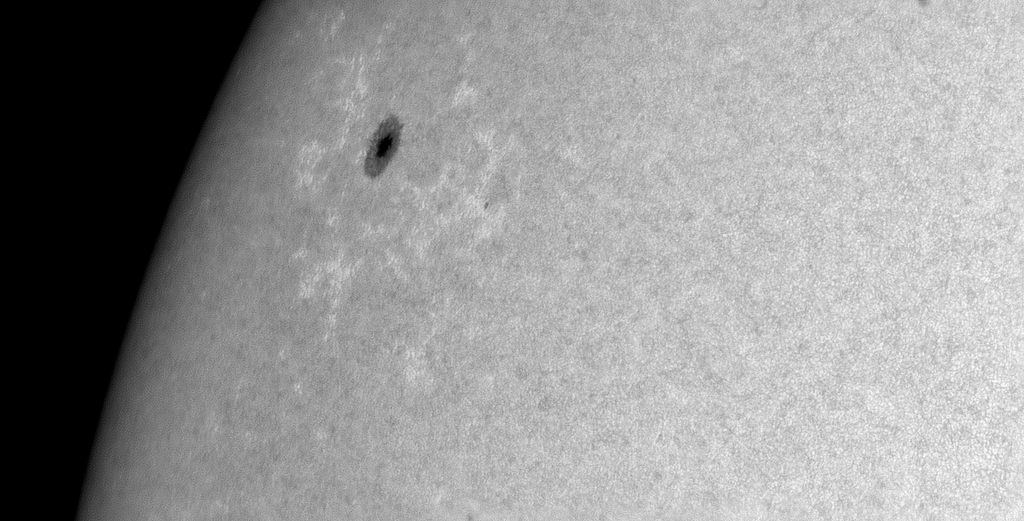
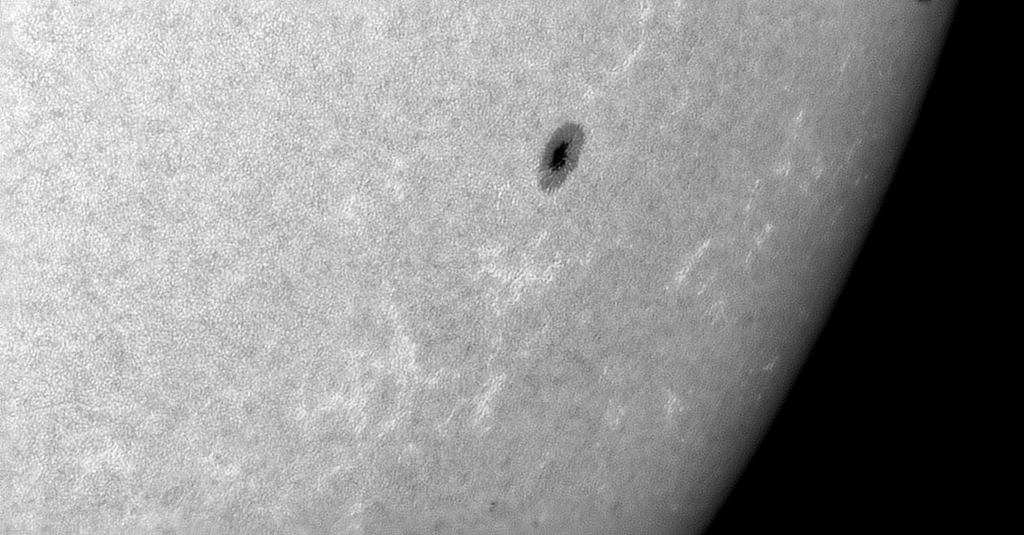
Other Sunspots
As expected, granulation detail lessens towards the darkening limb of the Sun, but granulation and faculae visible.
Final Thoughts: The Verdict on the Baader 2" Cool-Ceramic Safety Herschel Prism Mark II
Reflecting (last pun) on the use of the Baader Herschel Prism, it's not just about the technical excellence of the product; it's about the experience it provides. Whether you are a seasoned astronomer or a hobbyist, the Baader provides a window into the dynamics of our Sun with unmatched clarity and safety. It's an investment that pays off with every use, revealing more of the Sun's secrets each time.
After numerous sessions with the Baader 2" Cool-Ceramic Safety Herschel Prism Mark II, I can confidently say that this tool is a game-changer for solar observation and photography. From the unboxing experience, which speaks volumes about Baader's commitment to quality and customer satisfaction, to the actual field use where it performs admirably, every aspect of this product has clearly been crafted with precision, passion, and care. It meets the high standards of quality and functionality without compromise.
The ease of use, combined with the educational value of the detailed manual, makes it accessible for beginners while its advanced features satisfy the demands of seasoned astronomers. The safety measures are reassuring, the build quality is impeccable, and the imaging results are exceptional. In the realm of solar observation, where the fine line between quality imaging and equipment safety is often hard to navigate, the Baader Herschel Prism stands out. It’s an investment that not only enhances your view of the sun but also enriches your understanding of solar astronomy.
In conclusion, the Baader Herschel Prism isn't just a piece of equipment; it's a portal to the sun's fiery grandeur, a shield against its might, and a teacher of its dynamics. For anyone serious about solar astronomy, this isn't just a recommended purchase; it's an essential one.
You can find further product information as follows:
Baader 2" Cool-Ceramic Safety Herschel Prism Mark II - (Visual/Photo)
Leave a comment